IPTV panel service requires various needs for it to run stable. Among all those, a stable management panel is of invaluable importance, which allows resellers not only to manage their accounts, but also the ability to run it on any device, especially phone and tablet, to be able to access it on-the-go.
In this tutorial, I will show you how you can work with our IPTV panel as a reseller. The guide is going to be detailed and step-by-step. Since our panel is based on the usual structure of all the ones available in the market, you should take this guide as an example for almost all of the panels out there.
Introduction to our IPTV panel
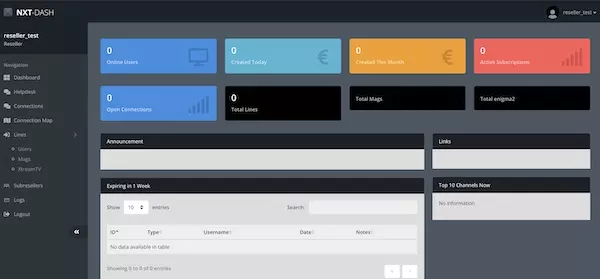
We are using NXT-Dash as our IPTV CMS (Content Management System), formerly known as ZAPX. It was first developed based on Xtream Codes source code right after they got shutdown and later developed to a more advanced system for itself. There are various features available to us, enabling us to provide a reliable stream feed on all channels. Another good thing about this Content Management System is that it is very well-organized and full of useful tools about which we are going to base this article on.
Understanding the main dashboard sections
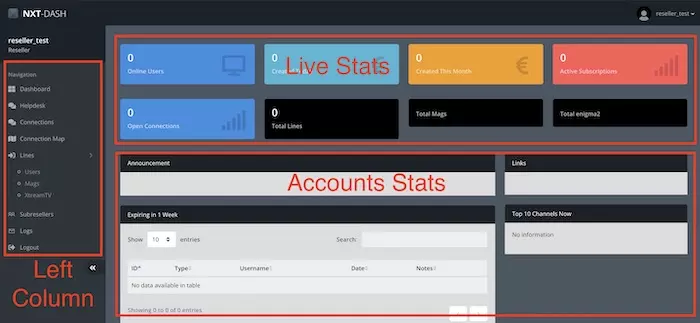
The dashboard has 3 blocks which splits into monitoring tools, sections access and overall account performance usage into different eye-catching parts. Let’s have a look at each to understand what we can expect from them.
-
Live stats
Here you can find live statistics of the connected users, the amount of connections they are using (Depending on which connection plan they are on), and the total accounts created on the panel.
-
Account Stats
Information like accounts near to expiration date, top 10 channels in use and also the announcement from the admin appear in this section.
-
Left Column
You can access all the features and sections of the panel through this column.
Now let’s talk about the left column a bit more extensively as the main functions lay there.
Monitoring the connected users to the panel
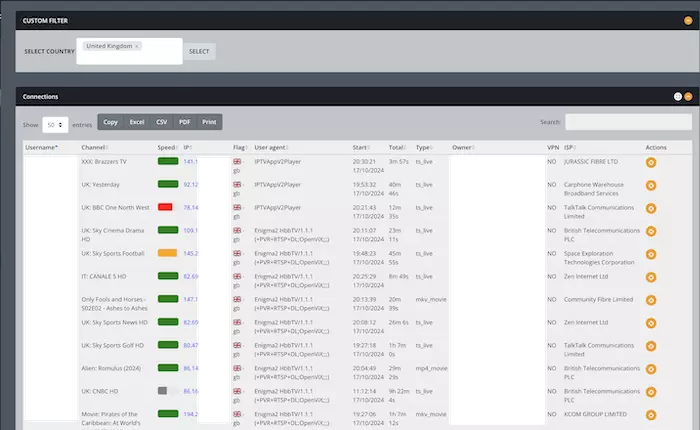
If you decide to have an overall look at where clients are connecting from, simply click on Connections on the left column. You can also utilize the filter function on top to select a specific country and see clients who are connected only from that region. Following details are provided in the Connections page:
- Account Username
- Channel that the client is watching
- Speed which is the quality of the connection between the client and our servers
- Client’s Internet IP address
- The country flag
- User Agent of the device/application they are using
- Starting time of when client started watching the channel
- Total period of viewing
- Type of the stream format they are using e.g. MPEGTS or HLS
- Owner which can either be your name or your subreseller’s name (will be explained soon)
- Whether the connection is a VPN
- Client’s ISP (Internet Service Provider)
- And Kicking the connected user – useful when client’s account stuck on the server and they cant reconnect
There are other functions available such as Copying the table date as in Excel sheet or CSV file, or using the search field to look for a specific username.
Clients’ connection origin to the panel
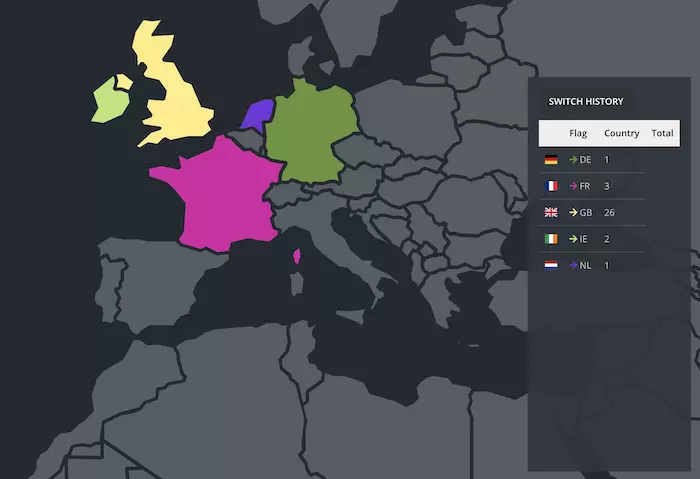
If you are curios to know where your users are connecting from, the Connection Map is a cool feature to use. Worldwide map will load in front of you and each country has a distinctive color assigned to. The number of connected clients from each region is also shown in the table. One of the good uses of this is the marketing which helps you improve your income. You will know which countries produce more clients so you focus on that.
How does Lines section in the IPTV panel work?
This is the most important section. It contains the accounting part. Here you will create your Lines. Let’s explain it in details.
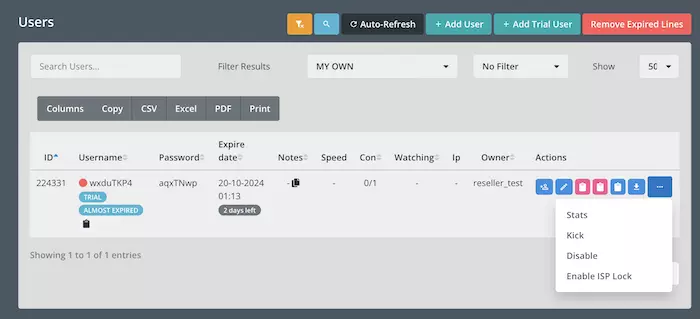
-
Understanding Streaming Lines overview page
This section is under Lines and called Users. Here we create streaming lines like M3U. The top buttons might be a little bit tricky although the names should give a good hint of their functionality:
- The Yellow-ish button shows all users, from you or subresellers
- The button next to it is a magnifier, zooming in so you can see the panel better
- Auto-refresh pulls client data in the overview list below every few seconds
- Add User is where you create paid accounts, the ones which consume credits
- Add Trial user allows you to create IPTV free trial accounts
- Remove Expired Lines deletes all the expired users
Below these buttons, you have Search field by which you can search for a specific username. Filtering Results which filter the listed accounts below according to whether they are made by you, your retailer or all. You can also filter these results by the account condition, like whether they are expired, trial and … .
If you need to extract the list in a sheet, you can use the extraction buttons which allow you to download a list of your accounts as CSV, Excel sheet or PDF. Now let’s focus a little bit on the account we created here.

As you can see, we have created a streaming line as an example. The account is a Trial and since it is close to the expiration date, there is a tag saying Almost Expired. Other columns are self-explanatory but let’s take a look at the control buttons, Left to right.
- The human icon with a plus is Extend, you can upgrade a Trial to a paid account.
- Pen icon is Edit, you can edit details of an account
- First Pink icon is to copy M3U URL in Clipboard and then you can paste it anywhere you want
- This one is the same but will copy M3U_Plus extension which has all categories and program icons
- The same button in Blue copies EPG URL to clipboard
- 6th button is Download List which opens a full URL Extension playlist, for instance if you need the Autoscript command for E2 devices, or specific extensions for other rare devices
- Stats shows the channels that the client has watched
- Kick disconnects the client session and drop them, sometimes a user’s account is stuck and this option is handy
- Disable blocks your client’s account
- ISP Lock paires the account to the first ISP that the client use to connect to the account and will disallow connections from other ISPs
Now that we know the functions of all buttons, fields and columns, let’s put it into good use and create trial and normal paid accounts in this section.
-
Creating an IPTV trial streaming Line in IPTV Panel

From the overview page, click the Add Trial User button at the top of the screen.
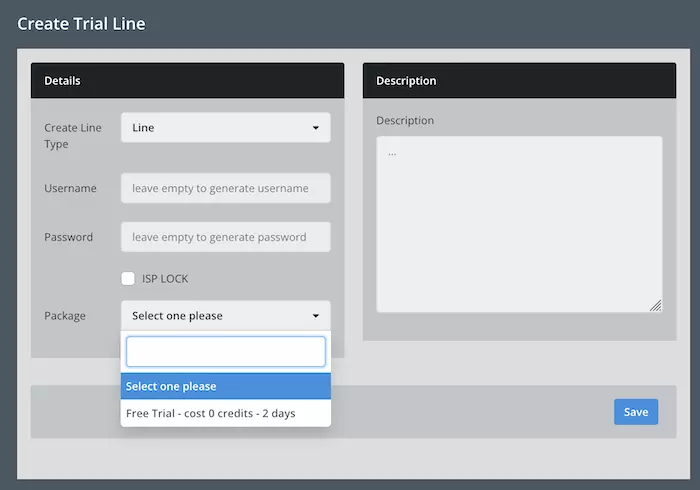
Choose “Select One Please” in front of the Package. You should see the IPTV trial package being available for selection. It’s 2 days long and free of charge.
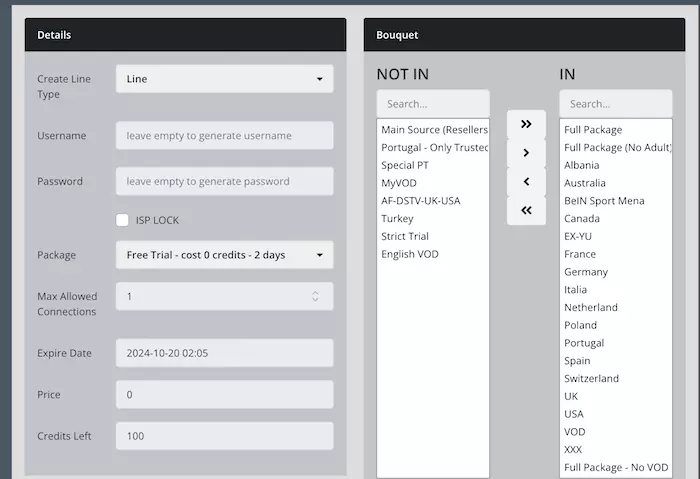
After selecting the package, screen will change to the above. On the left side, you see the credit calculation, expiration date of the account after you create it and on the right the channel bouquets that you can assign to this account. The ones in the IN column, will be included in the account playlist.
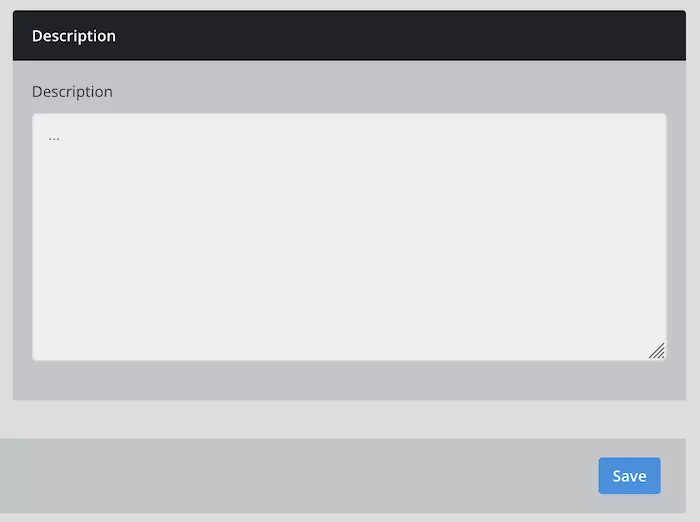
You can add a description to the account. This is very important. You should keep track and record of the lines you are creating. A good description here will later help you look up the account using the search field on the overview page. Once ready, click Save.

Our Trial account is created and ready for use. I have added a description as well for future references.
-
Creating a Paid line on the panel

From the top of the dashboard, click Add User.
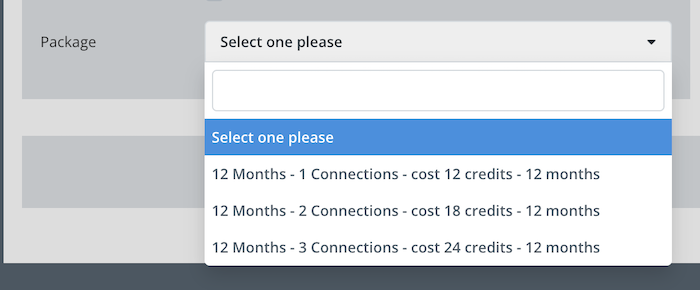
In the Package section, select your desired choice. The panel we have created for this tutorial is on Plan 1 which only has 12 months accounts. Let’s pick 12 Months 1 Connection.
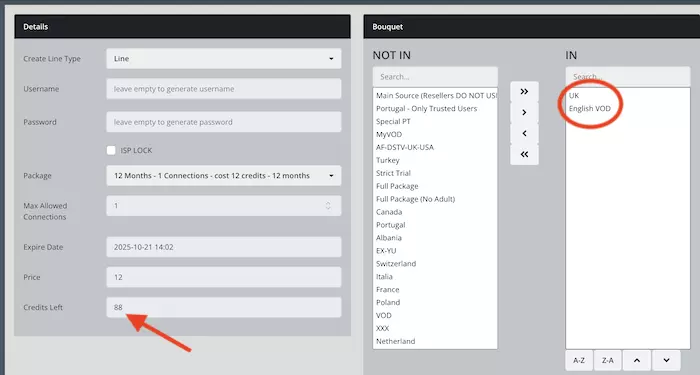
For a change, I have selected UK channels plus English VOD (Movies and Series) and excluded the other content. As you can see now, since the line is paid, credits are being consumed.

New paid line is created and ready. I have also added a note for this user as well. There is a black document sign right beside the username and also notes. It’s the Copy button letting you copy those data and pasting them in your messages to clients or anywhere you want.
How to create and manage IPTV subresellers on IPTV panel?
-
The importance of recruiting resellers
I always encourage our clients to focus on this part which I call it The Money Making Machine. You need to think smart and focus on your marketing in an efficient way. When you create and manage your single-users, that’s your Job, but when you recruit your own resellers and they create users of their own and bring you money, that’s your Business. You need to put more effort on the 2nd part.
The idea is making money out of this with the least effort, of course I don’t mean being lazy but efficient. The example below would make the concept clearer.
Imagine you have 100 single users. You will need to manage them one by one in terms of purchase, renewal, customer support and so on. Now what if you have 1 Distributor who has 100 users? The reseller is the person who does it all for his customer but purchases credits from you. You get issue reports from one person, answer to one person and that reseller is the one who handles the hard work.
-
Creating a subreseller
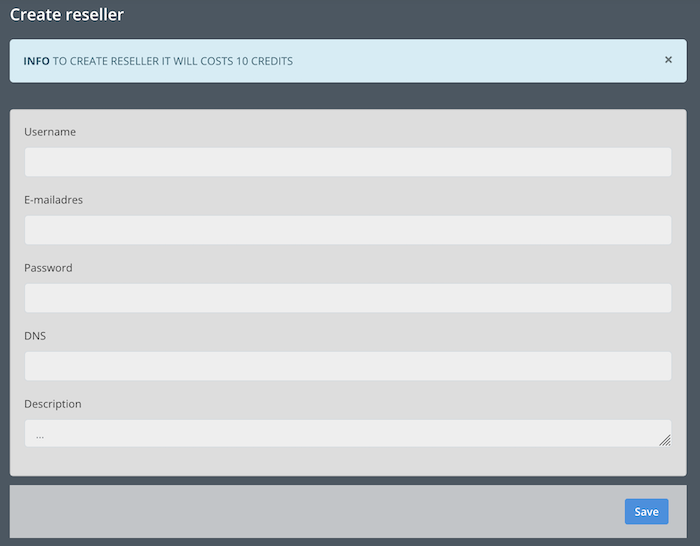
From the left column open the Subreseller menu and click Add. The above should appear. In this form you can enter the details of your reseller including Username, Password, Email address, a description about them which can be edited and updated later as well.
One of the main things on this form is the DNS (Domain Name System). You can assign a DNS address to your subreseller which is basically their own address (domain or sub-domain). By setting this up, whenever they create a line and try to get the M3U address, their own dns address will appear on the line instead of yours.
-
Benefits of assigning a DNS to your IPTV panel
I should make one thing clear: The domain should be purchased by your subreseller as it is their responsibility.
Whenever a reseller has their own DNS, it will ensure that they are not affected by whatever may happen to yours. For instance, if your address is leaked online and results in some countries or ISP’s blocking it, if your subreseller was using the same, they will be affected as well. Now, if they have their own DNS address, they will be safe. This can be said vice versa as well, you being safe from theirs getting leaked.
Another thing is, if I am with a provider as their reseller, maybe one day they get shutdown, or fail to deliver the quality they promised me. I can take a backup of my accounts, import them onto a new provider’s panel and start fresh. I will also change the IP address behind my DNS and my clients will be redirected without noticing any downtime.
Note: whenever you add a DNS to your subreseller, always let us know to provide you with steps and proper IP address assignments.
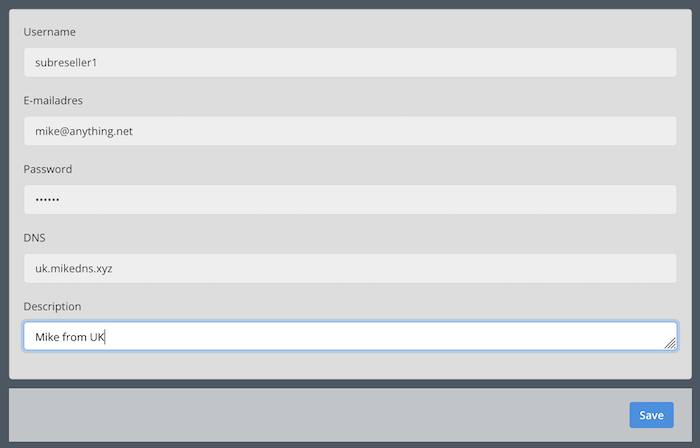
I have filled the form with an example. Mike is my subreseller. He has given me a sub-domain uk.mikedns.xyz to add to his panel for IPTV, which he has created on his domain registrar and I have added that to his panel. I have given him our core server IP address to assign to this DNS. Same applies to you when adding DNS address of your own subresellers, contact us to provide you with the IP.
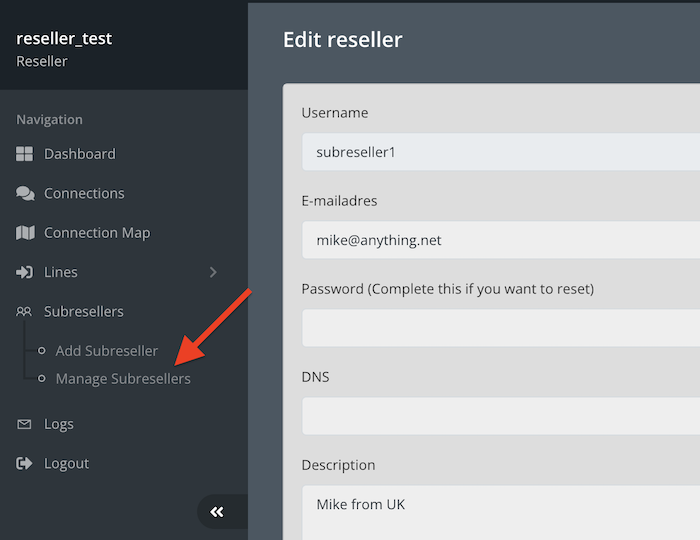
The account is ready. Now click on Manage Subresellers to open the overview page.

This is the overview page. At the right side, you can see 5 buttons.
- Edit button which allows you to revise or change details
- The $ sign is Add Credit button
- 3rd button is Profit system which we are going to explain later on – probably the most interesting
- 4th icon is Disable function, blocking the reseller access to the panel.
- Last one disables the user and also their created lines – total block basically
-
Adding credits

From the subreseller overview page click the dollar sign.
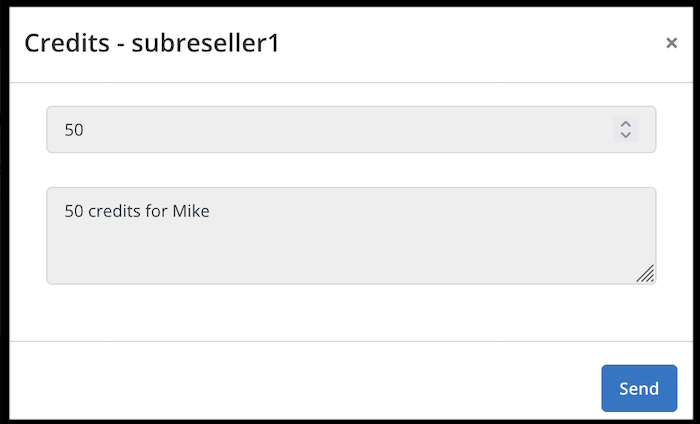
You can add credit through this pop up window. For instance I am adding 50 credits and also writing a note. Then click Send.

They has received their credits and they can use it now.
-
Using Profit System to apply commission rate on credits
Earlier, we spoke about being efficient and recruiting resellers of your own. Let’s put some action to those words. Our Panel of IPTV has a feature called Profit System. It is basically a calculator by which you can apply extra rates on credit prices to make money from what you sell to your retailers. Below you will see how it works and how it does take effect.
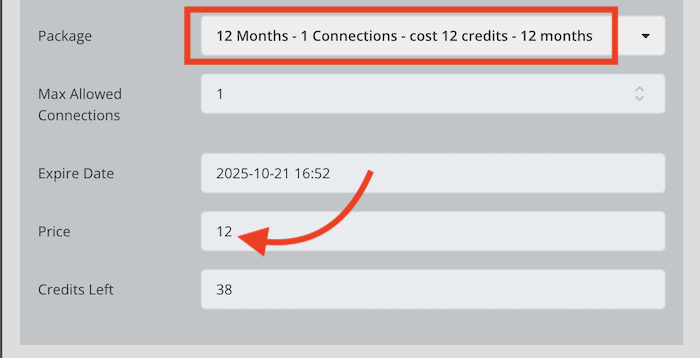
If you remember, we created a subreseller account above, we have just logged into it and tried to create a 12months 1 connection line. As you can see, the price is 12 credits. Now we add some commission to this price and see how it works.

Log into your dashboard, from left column choose Manage Subresellers and then click the Blue button in front of their name.
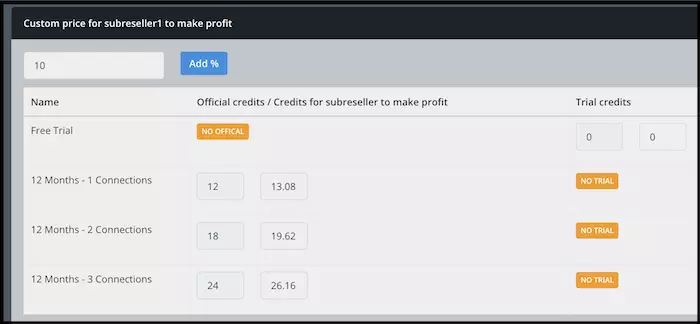
From the top, add the percentage you want to add to your retailer credit prices and then click Add. It will add an extra price to the default credits based on the percentage you have set. Do note that you can manually edit those prices as well. Finally click Save.
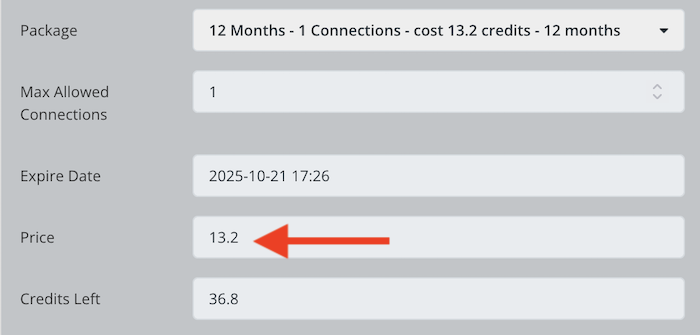
The above picture is from the subreseller panel trying to create the same 12 months 1 connection plan. As you can see the price has gone higher from 12 credits to 13.2 which is a 10 percent increase.
Having a look at IPTV Panel Logs section
It is a good idea to keep track of your activity on the IPTV panel. Sometimes even you need to track the actions taken to find the reason for a mistake. All the activities are available in the Logs section. It has 3 sub-menus which we explain below.
-
Activity Log

This section of the panel, provides details on you or your sub-users’ activities. It shows the date, time, the person who took the action and the action itself.
-
Credit Log

Here, the process of credit addition show. Whether you as the main reseller or your subreseller, who ever gets the credit.
-
Login Log

Title speaks for itself: the IP address and the time of the admin login are available here. This includes both the owner and retailers.
I hope this tutorial is a good guide to you, helping you through the adjustment process. In the meantime, never doubt our support. If you have any questions, drop us a message.
I need a NXT DASH panel
Hope you’re doing well Muhammad. I have responded to your email personally. Continue there so we see if we are fit to be your provider. If we can provide what you need, then more than happy to serve you with our service.
Hi
How much is iptv reseller hub or panel with full play list with xxx
Hi,
Depending on the credit plan you want to go for, price varies. You can see the full price listing on our homepage for the IPTV reseller panel.
Do let us know which country channels are the most important for you so we let you know whether we can provide them with high stability or not.
Precisava de falar consigo sobre nxt é possível?
Hi, I would appreciate it if you could write your messages in English.
Yeah sure, you can contact us and we can have a chat about NXT panel.
You can use our contact form to reach us here > https://iptvresellerhub.com/contact/
Hi I am new to this was hoping you can explain how the panels and credits work
Hey Kunal,
That would be my absolute pleasure.
The Panel, as explained about, is for creating and managing your IPTV accounts. Crediting system with us is based on 1 credit = 1 euro = 1 month. Meaning to create a 12 months account, you will only use 12 credits and in other words it will only cost you 12 euros.
You can then sell each account based o your own price-listing to your clients.
You can also recruit IPTV resellers and let them work for you.
how can i setup this panel ?
Hey Mohamed.
We have IPTV Reseller deals available by which you get access to this very same panel to run your own business. If you need further information, either let me know here or open a support ticket.
how can i get the panel??
Hey Bobby,
Are you asking as a reseller wanting to join our reseller program? If yes, you can see our credit plans in the following page on our homepage > https://iptvresellerhub.com/
Also, let me know which country channels are the most important for your so I provide you with detailed info whether we are strong on that package or not.
Need Nxt Dash
Hey Anas, our reseller panel is based on NXT dash. If you want to try it out, please fill the contact form.
Hy
Need panel as to be admin.
Need suggestions 1st
Hope you are doing well Hisam.
Are you asking for NXT panel as the owner or as the reseller?
We provide reseller panel based on credits with stable content. Credit prices are here > https://iptvresellerhub.com/#prices
If your request is something else, please let me know.
I get asked this question a lot by resellers & I’m not quite sure what the answer is other than it sometimes helps with overriding blocks but, may I ask “What does the bypass global restrictions mean?” please, thank you
Hey Paul.
If you are referring to the Create/Edit page in Streaming Lines section, that is to bypass the User-Agent Global Restrictions. For instance if you disallow LGTV user agent in the panel, by selecting this Bypass Global Restrictions checkbox, that streaming line will bypass the restrictions.
This has nothing to do with Regional blocks. Thats a completely different story. We do have certain remedies for that in our panel of course.
Is there a place where you can try a free iptv panel and see how it works before you buy?
Hey Carsten.
Please fill the contact form and I will help you out